Online Live Girls

Showing posts with label Blogger Lessons Tricks. Show all posts

Friday, July 2, 2010

How To Check Blog Ranking

How to check page rank?
How to increase page rank?
How to check traffic rank?
How to increase traffic rank?

To check Page Rank, use Google's Page Rank.


page rank

To increase page rank, get more backlinks from other sites. The more backlinks your site have, the higher the rank. One way is to exchange links.

To check Traffic Rank, use Alexa's Traffic Rank.

alexa

To increase the traffic rank, get more traffic.

The result may vary from time to time depending on the blog's performance.

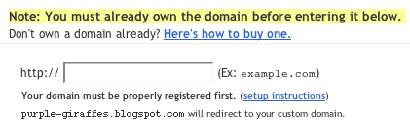
How do I use a custom domain name on my blog?

Publishing on Blog*Spot is the fastest and easiest way to use all of Blogger's great features. (And for free, no less!) If you don't care to have blogspot.com in your blog's address, though, you can get a domain of your own. We'll continue to host all your content as before, but it will be displayed at your new address. (Unlike FTP publishing, which requires you to buy both a domain name and a hosting service.)

Choose and Register Your Domain

The first thing you'll need to do is to choose a domain name, like example.com and register it. You can register domain names from any of a number of different registrars, and you can use .com, .org, .net or any other valid addresses. Remember: you only need to get the domain name; you don't have to pay extra for hosting service. The easiest way to register a domain is to buy your domain directly through Blogger. If you go this route, we'll automatically configure all of your relevant DNS settings and attach your new domain to your existing blog immediately.

Update the DNS Settings

DNS stands for Domain Name System, and a DNS server determines what site a given address takes you to. So far, you have a domain name but none of the servers on the internet know what to do with it yet. To take care of this, you need to do two things:
  • Create a CNAME record for your blog's address, which should be a subdomain of the form www.example.com.
    To create a CNAME record for your domain with the DNS, associating your domain with: ghs.google.com.The exact procedure for doing this varies depending on your domain registrar, but you can find instructions for many common registrars here. If yours isn't listed, or if you run into other difficulties, you can contact your registrar directly and they'll be able to help you out.
  • Create 'A' NAME records for your naked domain (blog.com)

    Note: The following information applies to naked domains only!! If you're setting up a subdomain then this does NOT apply to you! :-)
    Creating A records for your naked domain is important as it allows Google to redirect people who use in your naked domain name (blog.com) to your blog page (www.example.com). If you do not do this, visitors who leave off the www will see an error page.
    There are four separate A records you will create, and can be done from the same control panel you accessed your CNAME records. Simply point your naked domain (example.com, without the 'www') to each of the following IP addresses:
216.239.32.21
216.239.34.21
216.239.36.21
216.239.38.21
Your DNS setup is now complete!

Update Your Blogger Settings

Almost done! At this point, you have a domain name, and the DNS servers know to direct people to Google when they want to see your blog. But Google hosts lots of blogs, so we have to make sure the right one is associated with this domain. You'll do this on the Settings | Publishing tab for your blog in Blogger.
If you're publishing on Blog*Spot, you'll see a link near the top offering to switch you to a custom domain. Go ahead and click that link.
The Blog*Spot Address setting now changes to Your Domain. Fill in the domain you registered, and then save your settings.
Now the only thing left to do is to tell everybody about your new address!
Notes:
  • If your new domain isn't taking you to your blog, wait another day or two to make sure all the DNS servers have been updated. If it still isn't working, contact your registrar to make sure you entered the DNS settings correctly.
  • Your original Blog*Spot address will automatically forward to your new domain. That way, any existing links or bookmarks to your site will still work.
  • You can use this feature with domains (e.g. example.com) or subdomains (e.g. ). However, you cannot specify subdirectories (e.g. example.com/blog/) or wildcards (e.g. *.example.com).
  • Your posted images will continue to display on your blog as described here.

Friday, June 25, 2010

How To Setup Custom Domain Co.CC For Blogger

Create Sub Domain on a Blogger Custom Domain

This tutorial is for all those who are already using Custom Domains with Blogger. If you already have a blogger blog at some Custom domain like www.yourdomain.com , then you might want to add a sub domains to this custom domain like blog.yourdomain.com gallery.yourdomain.com etc. An example of such a sub-domain is bloggertemplates.bloggerplugins.org It is a blogger powered blog, which i created on the sub-domain. In order to create blogs at sub-domains, you need to create CNAME records for the same.

Create Sub Domain on a Blogger Custom Domain

Here we will learn how we can add a new sub domain to your blogger custom domain blog. As an example we will learn how to create a sub domain blog.yourdomain.com to your custom domain blog. (If you have need some other sub-domain change blog with what you want). To do that we need to create 2 CNAME records.(one of them will be used for redirection purpose)
1. blog.yourdomain.com pointing to ghs.google.com
2. www.blog.yourdomain.com pointing to ghs.google.com
To create the CNAMEs you need to login to your domain control panel. So if you bought the domain via blogger, then you have to first login to Google APPS to get into your Domain Control panel

If you bought the domain from Blogger

If you bought the domain from within Blogger, then you have to get into your domain control panel. To do that go to
http://google.com/a/cpanel/yourdomain.com
you will have to replace yourdomain.com with your domain name. From the Google APPS dashboard, Go to Domain Settings > Domain Names and click on Advanced DNS Settings. From the new page, Sign in to DNS Console(of Enom or Godaddy with the username and password that you get from here.)

CNAME Creation on Different Registrars

1. Creating  CNAMEs on Enom

1.Login to your Enom account(If you signed in from Google APPS, you can directly proceed to sep 4)
2.From the drop-down menu at the Domains tab, select My Domain and you will be directed to the Manage Domains  page.
3.Click on your domain name
4.To add a CNAME record, click NEW ROW.
5.Enter blog as Host Name , ghs.google.com  as Address  and CNAME as Record Type
Similarly add another record with www.blog as Host Name , ghs.google.com  as Address  and CNAME as Record Type
enom

2. Creating  CNAMEs on Godaddy

1.Login to your Godaddy account(If you signed in from Google APPS, you can directly proceed to sep 5)
2.Open the Domains tab and select My Domain Names. You'll be directed to the Domain Manager page.
3.Click on your domain name and click More Settings from the Dashboard
4.Click Manage under Total DNS/MX
5. Click Add New CNAME Record.
and create it as shown in the picture.
godaddy
Create another one
godaddy2

3. Creating  CNAMEs on Name.com

1. Login to your Name Account
2.Click on  Account and then on your Domain name
3.Click on DNS Management form the Right Sidebar and add the details as shown in the screenshot and Submit
name
Add another one as shown in the screenshot and Submit
name2

4. Creating  CNAMEs on Namecheap.com

1. Login to your Namecheap account and click on your domain name.
2.From the Left Sidebar, Click on All Host Records
3.Add the Records as shown in the Screen shot
namecheap

Switching your blogspot blog to the Custom Sub-Domain

I assume that you have already have a blog which you want to switch to the custom-sub domain. Get into its Dashboard and navigate to Settings > Publishing > Custom Domain and click on the link saying “Already own a domain? Switch to advanced settings” Now provide the url blog.yourdomain.com  or www.blog.yourdomain.com(you can opt any of them as per your wish)over there. Type the captcha and save the Settings. Enable the redirect  option and Save the settings once again.
create-sub-domain-on-blogger

Widgets Add Google Talk To Your Blogger

Widgets Add Google Talk To Your Blogger


Google Talk, long a fixture in Gmail, can now be added to your blog as a gadget.

The Google Talk Gadget lets you send instant messages, transfer files, make voice calls (to other Google Talk users) and leave voicemail messages. If you paste a Picasa Web Album or YouTube URL into a chat session, the gadget gives you an instant preview of the photos and videos.


Widgets Add Google Talk To Your Blogger

Plugins Recent Comments Widgets in Blogger

Plugins Recent Comments Widgets in Blogger


இதை பயன்படுத்தி மகிழுங்கள் !!!


Customize Widget

http://.blogspot.com


characters


Plugins Recent Comments Widgets in Blogger

Thursday, June 24, 2010

6 FREE WAYS TO DOUBLE YOUR BLOG TRAFFIC IN LESS THAN A WEEK:

6 FREE WAYS TO DOUBLE YOUR BLOG TRAFFIC IN LESS THAN A WEEK:

Everyone want's traffic.You set up a blog with great content but,no one is visiting your blog,so what's the use of it.So, you need atleast a decent amount of traffic and what's great than getting that traffic for FREE?
So,here is the good list of 6 Free ways to get traffic to your blog.

1.SEARCH ENGINE:Yea! it brings lots of traffic to your blog.There are millions of people search in the search engines like Google,Yahoo,msn everyday.So,if your blog has so many good posts and is well indexed by google,etc..you will get a good amount of traffic via search engines.There are a few steps to look at if you want a decent amount of traffic from the search engines like "submitting your blog sitemap to google",yahoo to index you blog pages very quickly.And the other important one is adding meta tags to your blog.If you follow these two simple steps,then you will get a decent traffic(massive traffic if your content is good).

2.Submitting your blog to Blog Directories:You may know this before,submitting your blog to blog directories will bring you a good traffic.
Here is a good list of blog directories(there are so many directories,but the below one's will bring you a good traffic).Most of these blog directories ask you to register before you submit your blog.My suggestion is,create a new email address solely for this purpose so,your personal emails are not flooded with the emails sent by the blog administrators,etc.
You can find the Blog directories list here.

3.Participate in forums,groups,etc:Just go to google and enter your [major keyword + fourm] or [keyword+groups] and search.Suppose,your blog is about blogging,then search 'Blogging forum'.You will find some forums,groups related to your site.Register in the forums and post articles,etc with a link back to your blog(as a signature).Answer questions,clarify doubts and provide a link to your blog.But,Dont' SPAM.

4.Social Bookmarking:Social Bookmarking is another way to build good traffic to your website/blog.If you don't know what Social Bookmarking is
"Social Bookmarking is a practise of saving Bookmarks,tagging the posts with keywords in a website".Bookmarking means saving a specific website url(address) in your browser that you wish to visit later.There are so many Social Bookmarking sites like del.icio.us,digg,furl,technorati.
One good thing about these Social bookmarking sites is,you will get instant traffic.Just register with them,store your bookmarks,tags,.. and you are done,See your site meter blasting with traffic.

5.Submit Articles to Article Directories:Submitting articles to article directories is another effective way to build more traffic.By submitting to them,your articles get massive exposure and gain you more traffic.
Some of the popular article directories are goarticles.com,ezinearticles.com,articlecity.com,etc.
There are hundreds of article directories,just google it.

6.Leaving Comments on other blogs:Leaving comments with a link back to your blog is another good thing to do.Leaving comments in the related blogs is more useful and it also increases your pagerank.Always leave good comments and don't Spam(by placing links like'click here' like that).

How to Install Blogger Templates Downloaded From This Site?

Everyday so many readers leaving comments asking "How to install xml blogger templates?".
So, to make it easier for you, here is the complete tutorial on how to install blogger templates downloaded from this site..

1.First download the template and unzip the file using winrar or winzip. After extracting the file you will see a folder named Images(incase if you lost) and an xml file.

2.Now, sign in to Blogger dashboard and click on the layout.

click on the layout

3.Here is the important step, after uploading any new Blogger template, all of the previous widgets like your google adsense ads,text,profile,poll,etc etc will be lost.
So, to avoid this to happen, in this step click on 'edit' on all the widgets and copy the codes into notepad,etc.

backup widgets

4.Next, click on the 'Edit html' tab

edit html

5.You'll see an option to download the current template, so do it!

download the template

6.Just below that,there's an option of uploading new template.So, use the Browse button and upload the downloaded xml file(which we discussed in step 1).

Upload the template

7.Now, a message appear saying that your widgets are about to be deleted.Click on the Confirm & Save (no problem doing this because we already copied the widget codes in Step 3).

confirm and save

Now you successfully installed the template :)
Click on the 'Page elements' page now and add the codes that you copied in step3 using the 'Add a Page Element' option.

Note:The *Images(incase if you lost)* folder contains all the image files used in the template.
Daily thousands of template copies are downloading from this site.. so, in future if my server bandwidth exceeds, you may see images not loading in your sites.So, For this not to happen, Upload all the images to your own server..
Doing this is very simple, Click on the 'Edit html' and go through the template code and replace all the image links(starts with http and ends with .jpg or .gif or .png) with the direct image links you got after uploading the images to any Free image hosting service like photobucket,etc. and SAVE THE CHANGES.

Placing Adsense Ads Inside or Between Blog Posts

How to add adsense ads inside Blogger blog posts or between blog posts:-

Adding adsense ads inside blog posts is a very good thing to do to increase your CTR.
CTR means"(the number of times your ad clicked) divided by (number of times it is shown).So,the more CTR you have,the more $$ you get.

As we know,there are more chances for the ads to be clicked when they are in the middle(blog posts) rather than at the sidebars(especially the right sidebar),footer,etc.So,


How to place adsense ads between Blog posts:

By doing this,the adsense units will be displayed between the blog posts in the homepage,archive pages and permalink(individual post pages).
Follow the procedure to do this:

1.Sign in to your blogger dashboard>click on the layout link

click on the layout link
2.Click on the Edit link in the "Blog Posts' column[look at the below screenshot]
click on Edit ..............a pop up window opens..........
3.Check the box next to 'Show ads between Posts'

next,configure the ads,choose the format,colours,etc and SAVE THE CHANGES.configure the ads That's it! Now your adsense ads will show between blog posts.

If you want to know how to add the adsense ads inside the blog post rather than between the post, follow this:-
Showing adsense ads inside Blogger blog Posts:-
1.Sign in to your blogger dashboard>layout>Edit html
Check the box next to 'Expand Widget Templates'


2.Scroll down the window till you see this code
<b:if cond='data:post.includeAd'> <data:adEnd/> <data:adCode/> <data:adStart/> </b:if>


3.Replace that code in the template with the below code
<b:if cond='data:blog.pageType != "item"'> <b:if cond='data:post.includeAd'> <data:adEnd/> <data:adCode/> <data:adStart/> </b:if> </b:if>

4.Again,scroll down the template and find out data-post body tag[look at the below screenshot]
and paste the below code just above that code{this will show ads above the post body}.If you want ads to show below the post,paste the code below that tag.
Here is the code to paste:-
<b:if cond='data:blog.pageType == "item"'> <b:if cond='data:post.includeAd'> <data:adEnd/> <data:adCode/> <data:adStart/> </b:if> </b:if>
That's it!
Leave you comments if you like the post or if you have any questions doubts.

Submit Blogger Sitemap To Yahoo To Index Your Web Pages

This post explains how to submit your blogger sitemap to Yahoo.By submitting your sitemap to yahoo, they will index your web pages in yahoo search engine and provide you with detailed information related to your blog like which pages are linking to yours,popular pages in your site and you can submit and track feeds for your sites.
Also,you have the choice to delete any urls of your blog if you won't want to index certain pages of your site.
Submitting your site to yahoo is easy and give your web pages more exposure.
All you need is a YAHOO ACCOUNT(ID).However,you don't need an yahoo ID to know the information like how many pages are indexed,etc.But,if your blog is a new one or no pages in your blog are indexed(type your blog url in yahoo search and see to check whether your web pages are indexed or not), then you want Yahoo id to submit your sites,feeds,etc.
Let't see how to make yahoo index your webpages by submitting your blog sitemap.
1.Go to Yahoo Site Explorer


2.Click on the 'Sign in' link which is at the top of the page,see the screenshot below(If you don't have a Yahoo id, you can get one here) and sign into your accoutnt.

click on the 'sign in link'

3.Type your blog url in the box provided as shown in the below screenshot.Don't forget to replace the 'yourblogurl' with the original url of your blog and click on the 'Add My Site'
4.After adding your site,you need to Authenticate(Verify your ownership).
There are two ways to verify your ownership.One is to upload a file to the root directory of your site which can't be possible in blogger.
Another one is to 'adding a metatag' which is possible and the only way to verify ownership for bloggers.First,copy the metatag..
Next,sign in to your blogger account>Edit html and paste the metatag below the head tag and SAVE THE CHANGES,look at the screenshot below.
Next,you will get a message saying that 'Your site is pending authentication'
Note:Don't remove the metatag,they will revalidate your ownership by checking your ownership regularly.
5.Next,go back to the 'Site explorer home', and check the box next to your blog url and click on the Manage button.


6.Type rss.xml or atom.xml in the box provided.It helps yahoo to discover more of your site content via your rss or atom feeds and to index your blog pages quickly whenever your blog is updated.Next,click on the add feed button.


That's it.Now,you have sucessfully submitted your blog sitemap to yahoo.Check your account after a couple of days and you will see your blog indexed in yahoo search engine.
Meanwhile,if you didn't submitted your blog sitemap to google,please read this about How to Submit your blog sitemap to Google

How To Submit Blogger Sitemap To Google-Useful Tips For New Bloggers

This tip explains how to generate and submit blogger sitemap to google webmaster tools:Before doing this,let me say what are sitemaps and how they will help us.The reason we use them is,they will help google bot to crawl,index pages of your site and tell you if there are any problems when they try to index it.It also helps you to know,how many pages exactly are indexed,and what people searched in the search engine to visit your site.
Let me explain the detailed procedure on how to submit your blogger sitemap to google.
1.First,go to google webmaster tools and sign in with your gmail account.
2.After you logged in, you will see this asking you to add a site.
google webmaster tools
Add your blog url(ex:kranthitips.blogspot.com).Don't add with http or www.

3.Next,it asks you to verify your site.It is just to confirm whether you are the owner or not.

CLICK on the 'verify your site' link.

click the 'verify your site' link


Next,

choose verification method


4.There are two ways to verify your ownership but, there is only one way for the blogger users to add a metatag.

copy the metatag
5.Copy the metatag.
Now,sign into your blogger account>click the layout button>Edit html and paste the metatag just after the head tag and save the changes.

paste the metatag like this
and click the verify button in the google webmaster tools and there will be a confirmation message saying that you have sucessfully verified.


conformation message
Now,you have to submit a sitemap for google to crawl your site.Go back to the google webmaster dashboard or (home) and click the 'Add' link which is next to your blog name and in the Sitemaps column.Then,you see this,


Choose 'Add general web sitemap' from the dropdown menu and type rss.xml or atom.xml next to your blog address as shown below


or
and click the 'Add General Web Sitemap' button.
6.That's it.Now your sitemap is successfully submitted to google.Check 2 or 3 days after and you will see the detailed statistics of your blog(indexed pages,any errors,etc.)
If you have any questions regarding this,you can ask here via your comments

இணையதளத்தில் வேலை

Work from Home/Online Job: Easy Online Part time jobs. Just spend 1-2 hours/day and Earn Min Rs.35,000/Month. Google Adsense Jobs Powered By TOP Online MNC Company Google.Com. Just Copy Paste Work Only. Sample Job ID Blog: www.chennaionlinejobs.in . If you need Google Adsense Publisher Job ID Blog site? Cost Rs.1000 Only. Contact Me...me@manibharathi.com Mobile:91-09380083338 Tamil Nadu & Whole India. ///// Google Adsense Approval Tricks! Contact Me.////

தமிழ் நடிகைகள் படங்கள்


என்னைப் பத்தி ஹி...

My photo
சென்னை, தமிழ்நாடு, India
என்னை பத்தி நானே என்னன்னு சொல்றது??? நீங்க தான் சொல்லணும் நம்ம அருமை பெருமையெல்லாம்!!!

இணைப்பில் இருக்கும் நபர்கள்


பிடித்ததில் படித்து !!!

ஒருவர் உன்னை தாழ்த்திப் பேசும்போது ஊமையாய் இரு...

புகழ்ந்து பேசும்போது செவிடனாய் இரு... எளிதில் வெற்றி பெறுவாய்!


                                                  -அப்துல் கலாம்

EllameyTamil.Com Copyright © 2010 Designed by Manibharathi Powered by Hosting Palace